In this article we will look at how to work with graphics in AWT. We will look at various AWT classes that help us with creating graphics in our applications.
Graphics Class
In GUI applications, we can use Graphics class of java.awt package to create various graphics like lines, rectangles, circles, polygons etc. Let’s look at some of the methods available in the Graphics class:
void drawLine(int startX, startY, endX, endY) – Used to draw a line between twi points.
void drawRect(int startX, int startY, int width, int height) – Used to draw a rectangle starting from the top left corner with the given width and height. The coordinates of the top left corner of the rectangle are startX and startY.
void fillRect(int startX, int startY, int width, int height) – Used to draw a solid (colored) rectangle with the given parameters.
void drawRoundRect(int startX, int startY, int width, int height, int xDiam, int yDiam) – Used to draw a rounded rectangle whose x-diameter and y-diameter of the corners is given by xDiam and yDiam respectively.
void fillRoundRect(int startX, int startY, int width, int height, int xDiam, int yDiam) – Used to draw a solid (colored) rounded rectangle whose x-diameter and y-diameter of the corners is given by xDiam and yDiam respectively.
void drawOval(int startX, int startY, int width, int height) – Used to draw an ellipse inside an imaginary rectangle whose dimensions are specified by the given parameters. We can get a circle by giving the same value for both width and height.
void fillOval(int startX, int startY, int width, int height) – Used to draw a solid (colored) ellipse inside an imaginary rectangle whose dimensions are specified by the given parameters. We can get a circle by giving the same value for both width and height.
void drawArc(int startX, int startY, int width, int height, int startAngle, int sweepAngle) – Used to draw an arc inside an imaginary rectangle. The start angle and the sweep angle are specified by using startAngle and sweepAngle respectively.
void fillArc(int startX, int startY, int width, int height, int startAngle, int sweepAngle) – Used to draw a solid (colored) arc inside an imaginary rectangle. The start angle and the sweep angle are specified by using startAngle and sweepAngle respectively.
void drawPolygon(int x[], int y[], int numPoints) – Used to draw a polygon whose x coordinates and y coordinates of the points are specified using the x array and y array respectively. Number of points are specified using numPoints.
void fillPolygon(int x[], int y[], int numPoints) – Used to draw a solid (colored) polygon whose x coordinates and y coordinates of the points are specified using the x array and y array respectively. Number of points are specified using numPoints.
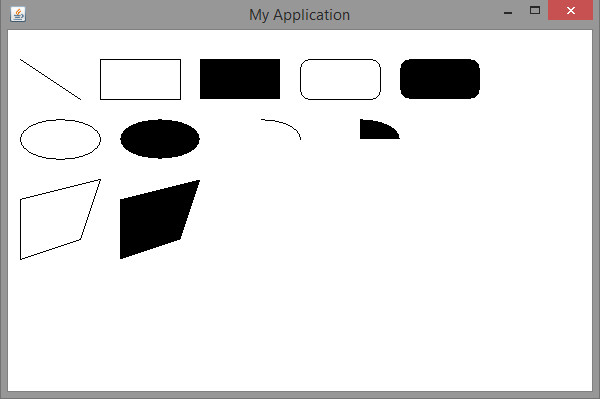
Following Java code demonstrates various methods from the Graphics class:
import java.awt.*;
import java.awt.event.*;

public class MyFrame extends Frame
{
	MyFrame()
	{
		setSize(600, 400);
		setTitle("My Application");
		setVisible(true);
		addWindowListener(new WindowAdapter()
		{
			public void windowClosing(WindowEvent we)
			{
				System.exit(0);
			}
		}
		);
	}
	public void paint(Graphics g)
	{
		g.drawLine(20, 60, 80, 100);
		g.drawRect(100, 60, 80, 40);
		g.fillRect(200, 60, 80, 40);
		g.drawRoundRect(300, 60, 80, 40, 20, 20);
		g.fillRoundRect(400, 60, 80, 40, 20, 20);
		g.drawOval(20, 120, 80, 40);
		g.fillOval(120, 120, 80, 40);
		g.drawArc(220, 120, 80, 40, 90, -90);
		g.fillArc(320, 120, 80, 40, 90, -90);
		int[] x = {20, 100, 80, 20};
		int[] y = {200, 180, 240, 260};
		g.drawPolygon(x, y, 4);
		int[] fillx = {120, 200, 180, 120};
		int[] filly = {200, 180, 240, 260};
		g.fillPolygon(fillx, filly, 4);
	}
	public static void main(String[] args)
	{
		MyFrame mf = new MyFrame();
	}
}
Output of the above program is as shown below:
Color Class
To use colors in our GUI applications, AWT provides the Color class. We can create a Color object by using any of the following constructors:
Color(int red, int green, int blue)
Color(int rgbValue)
Color(float red, float green, float blue)
We can get values of red component, green component or blue component of the color by using the following methods:
int getRed()
int getGreen()
int getBlue()
We can apply or get the color of the graphic object by using the following methods:
void setColor(Color newColor)
Color getColor()
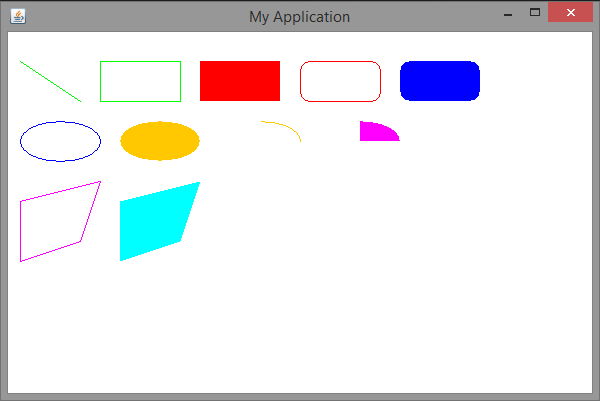
After applying colors the above Java program is as follows:
import java.awt.*;
import java.awt.event.*;

public class MyFrame extends Frame
{
	MyFrame()
	{
		setSize(600, 400);
		setTitle("My Application");
		setVisible(true);
		addWindowListener(new WindowAdapter()
		{
			public void windowClosing(WindowEvent we)
			{
				System.exit(0);
			}
		}
		);
	}
	public void paint(Graphics g)
	{
		g.setColor(Color.GREEN);
		g.drawLine(20, 60, 80, 100);
		g.drawRect(100, 60, 80, 40);
		g.setColor(Color.RED);
		g.fillRect(200, 60, 80, 40);
		g.drawRoundRect(300, 60, 80, 40, 20, 20);
		g.setColor(Color.BLUE);
		g.fillRoundRect(400, 60, 80, 40, 20, 20);
		g.drawOval(20, 120, 80, 40);
		g.setColor(Color.ORANGE);
		g.fillOval(120, 120, 80, 40);
		g.drawArc(220, 120, 80, 40, 90, -90);
		g.setColor(Color.MAGENTA);
		g.fillArc(320, 120, 80, 40, 90, -90);
		int[] x = {20, 100, 80, 20};
		int[] y = {200, 180, 240, 260};
		g.drawPolygon(x, y, 4);
		g.setColor(Color.CYAN);
		int[] fillx = {120, 200, 180, 120};
		int[] filly = {200, 180, 240, 260};
		g.fillPolygon(fillx, filly, 4);
	}
	public static void main(String[] args)
	{
		MyFrame mf = new MyFrame();
	}
}
Output of the above program is as shown below:

Suryateja Pericherla, at present is a Research Scholar (full-time Ph.D.) in the Dept. of Computer Science & Systems Engineering at Andhra University, Visakhapatnam. Previously worked as an Associate Professor in the Dept. of CSE at Vishnu Institute of Technology, India.
He has 11+ years of teaching experience and is an individual researcher whose research interests are Cloud Computing, Internet of Things, Computer Security, Network Security and Blockchain.
He is a member of professional societies like IEEE, ACM, CSI and ISCA. He published several research papers which are indexed by SCIE, WoS, Scopus, Springer and others.
Leave a Reply