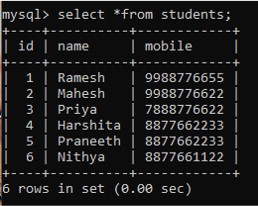
In this example, we will use MYSQL DBMS which contains a database named sampledb and a table named students. The credentials for connecting to the database requires username and password as root and 123456 respectively. The data in the students table is given below:
For working with MYSQL DBMS and the databases in it, MYSQL provides their own driver for Java. Programmer must develop the driver named Connector/J from MYSQL website. It is free of cost. After downloading the driver, place the JAR file in the classpath environment variable.
The code for displaying data from a table using JDBC is given below:
import java.sql.*;
public class GetData {
   static final String DB_URL = "jdbc:mysql://localhost/sampledb";
   static final String USER = "root";
   static final String PASS = "123456";
   static final String QUERY = "SELECT id, name, mobile FROM students";

   public static void main(String[] args) {
      // Open a connection
      try(Connection conn = DriverManager.getConnection(DB_URL, USER, PASS);
         Statement stmt = conn.createStatement();
         ResultSet rs = stmt.executeQuery(QUERY);) {
         // Extract data from result set
         while (rs.next()) {
            // Retrieve by column name
            System.out.print("ID: " + rs.getInt("id"));
            System.out.print(", Name: " + rs.getString("name"));
            System.out.print(", mobile: " + rs.getLong("mobile"));
            System.out.println();
         }
      } catch (SQLException e) {
         e.printStackTrace();
      }
   }
}
Output of the above program is given below:
ID: 1, Name: Ramesh, mobile: 9988776655
ID: 2, Name: Mahesh, mobile: 9988776622
ID: 3, Name: Priya, mobile: 7888776622
ID: 4, Name: Harshita, mobile: 8877662233
ID: 5, Name: Praneeth, mobile: 8877662233
ID: 6, Name: Nithya, mobile: 8877661122
We can see that the mobile number of students with id 4 and 5 is same. So, we are going to update the mobile number of students with id 5 next.
Note: The above compiles successfully only when we add the JAR file to the CLASSPATH environment variable as shown below:
Suryateja Pericherla, at present is a Research Scholar (full-time Ph.D.) in the Dept. of Computer Science & Systems Engineering at Andhra University, Visakhapatnam. Previously worked as an Associate Professor in the Dept. of CSE at Vishnu Institute of Technology, India.
He has 11+ years of teaching experience and is an individual researcher whose research interests are Cloud Computing, Internet of Things, Computer Security, Network Security and Blockchain.
He is a member of professional societies like IEEE, ACM, CSI and ISCA. He published several research papers which are indexed by SCIE, WoS, Scopus, Springer and others.
Leave a Reply