In this article we will learn how to implement Controlling LED from AWS using NodeMCU & Arduino IDE. If your are new to Internet of Things (IoT), learn about IoT by visiting our Internet of Things tutorial for beginners.
Contents
Aim of Experiment
To control home devices (LED) using a self-hosted page on Amazon AWS
Components Required
- NodeMCU – 1
- LED – 1
- 330Ω Resistor – 1
- Breadboard – 1
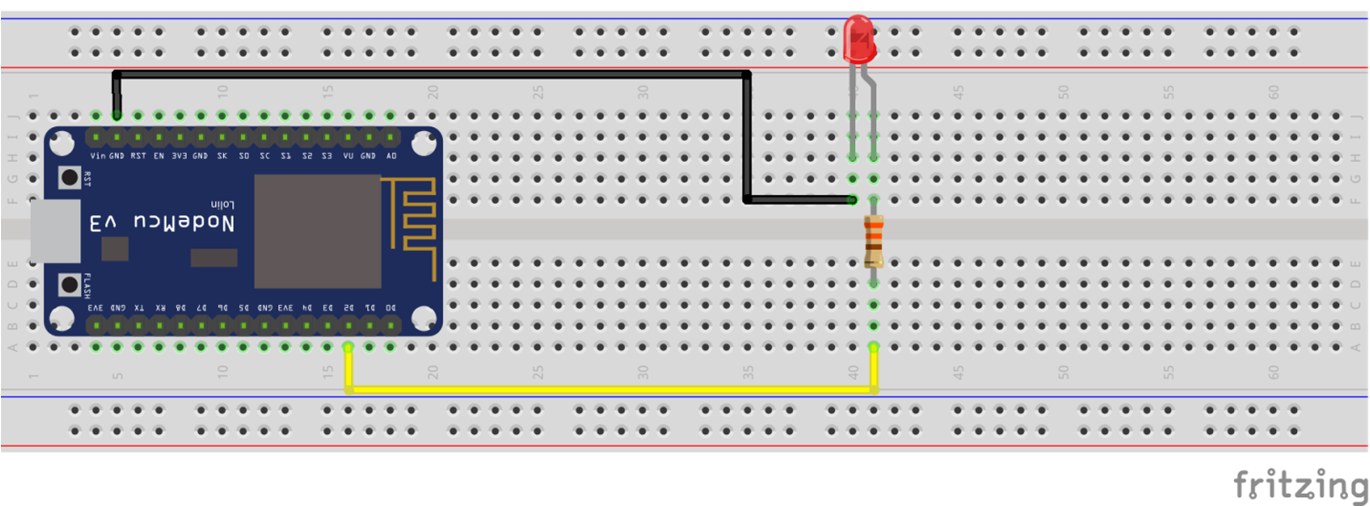
Connections Diagram (Schematic)
Code (C++/Arduino IDE)
#include <ESP8266WiFi.h>
#include <ESP8266WebServer.h>

/*Put your SSID & Password*/
const char* ssid = "ssid";  // Enter SSID here
const char* password = "password";  //Enter Password here

ESP8266WebServer server(80);

uint8_t LEDpin = D2;
bool LEDstatus = LOW;

void setup()
{
  Serial.begin(9600);
  delay(100);
  pinMode(LEDpin, OUTPUT);

  Serial.println("\nConnecting to ");
  Serial.println(ssid);

  //connect to your local wi-fi network
  WiFi.begin(ssid, password);

  //check wi-fi is connected to wi-fi network
  while (WiFi.status() != WL_CONNECTED) {
  delay(1000);
  Serial.print(".");
  }
  Serial.println("");
  Serial.println("WiFi connected..!");
  Serial.print("Got IP: ");
  Serial.println(WiFi.localIP());

  server.on("/", handle_OnConnect);
  server.on("/ledon", handle_ledon);
  server.on("/ledoff", handle_ledoff);
  server.onNotFound(handle_NotFound);

  server.begin();
  serial.println("HTTP server started");
}

void loop()
{
  server.handleClient();
  if(LEDstatus)
  digitalWrite(LEDpin, HIGH);
  else
  digitalWrite(LEDpin, LOW);
}

void handle_OnConnect()
{
  LEDstatus = LOW;
  server.send(200, "text/html", SendHTML(false));
}

void handle_ledon()
{
  LEDstatus = HIGH;
  server.send(200, "text/html", SendHTML(true));
}

void handle_ledoff()
{
  LEDstatus = LOW;
  server.send(200, "text/html", SendHTML(false));
}

void handle_NotFound()
{
  server.send(404, "text/plain", "Not found");
}

String SendHTML(uint8_t led)
{
  String ptr = "<!DOCTYPE html>\n";
  ptr +="<html>\n";
  ptr +="<head>\n";
  ptr +="<title>LED Control</title>\n";
  ptr +="</head>\n";
  ptr +="<body>\n";
  ptr +="<h1>LED</h1>\n";
  ptr +="<p>Click to switch LED on and off.</p>\n";
  ptr +="<form method=\"get\">\n";
  if(led)
  ptr +="<input type=\"button\" value=\"LED OFF\" 	onclick=\"window.location.href='/ledoff'\">\n";
  else
  ptr +="<input type=\"button\" value=\"LED ON\" 	onclick=\"window.location.href='/ledon'\">\n";
  ptr +="</form>\n";
  ptr +="</body>\n";
  ptr +="</html>\n";
  return ptr;
}
Extra Instructions
- Step 1: Dump the code to NodeMCU and connect to Wi-Fi network
- Step 2: See the serial monitor for IP address assigned to NodeMCU
- Step 3: Install ngrok software on your laptop (your laptop should also be connected to same Wi-Fi network)
- Step 4: Create a tunnel using ngrok and the Auth token provided by ngrok using the command given below:
- ngrok tcp 192.168.43.65:80 –authtoken <AUTHTOKEN>
- Step 5: Enjoy controlling your NodeMCU from Internet
Video Explanation
References
-
https://www.electronicwings.com/nodemcu/http-server-on-nodemcu-with-arduino-ide
- https://microcontrollerslab.com/accessing-esp32-web-server-anywhere-world-esp8266/

Suryateja Pericherla, at present is a Research Scholar (full-time Ph.D.) in the Dept. of Computer Science & Systems Engineering at Andhra University, Visakhapatnam. Previously worked as an Associate Professor in the Dept. of CSE at Vishnu Institute of Technology, India.
He has 11+ years of teaching experience and is an individual researcher whose research interests are Cloud Computing, Internet of Things, Computer Security, Network Security and Blockchain.
He is a member of professional societies like IEEE, ACM, CSI and ISCA. He published several research papers which are indexed by SCIE, WoS, Scopus, Springer and others.


Leave a Reply