In this article we will learn how to implement Control LED using Voice Commands and NodeMCU. If your are new to Internet of Things (IoT), learn about IoT by visiting our Internet of Things tutorial for beginners.
Contents
Aim of Experiment
To control home appliances using voice commands via Google Assistant and NodeMCU.
Components Required
- NodeMCU – 1
- LED – 1
- 330Ω Resistor – 1
- Breadboard – 1
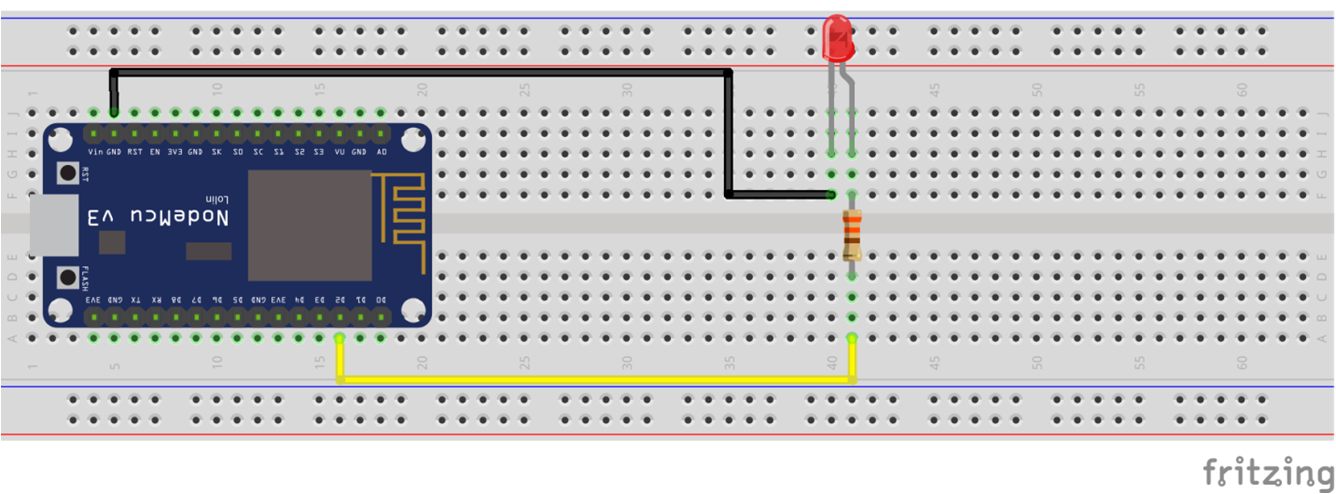
Connections Diagram (Schematic)
Code (C++/Arduino IDE)
#include <ESP8266WiFi.h>
#include "Adafruit_MQTT.h"
#include "Adafruit_MQTT_Client.h"

#define LED_PIN D1

#define WLAN_SSID "ssid"             // Your SSID
#define WLAN_PASS "password"        // Your password

/************************* Adafruit.io Setup *********************************/

#define AIO_SERVER      "io.adafruit.com"
#define AIO_SERVERPORT  1883                   // use 8883 for SSL
#define AIO_USERNAME    "username"            // Replace it with your username
#define AIO_KEY         "APIKEY"   // Replace with your Project Auth Key

/************ Global State (you don't need to change this!) ******************/

// Create an ESP8266 WiFiClient class to connect to the MQTT server.
WiFiClient client;
// or... use WiFiFlientSecure for SSL
//WiFiClientSecure client;

// Setup the MQTT client class by passing in the WiFi client and MQTT server and login details.
Adafruit_MQTT_Client mqtt(&client, AIO_SERVER, AIO_SERVERPORT, AIO_USERNAME, AIO_KEY);

/****************************** Feeds ***************************************/


// Setup a feed called 'onoff' for subscribing to changes.
Adafruit_MQTT_Subscribe Light1 = Adafruit_MQTT_Subscribe(&mqtt, AIO_USERNAME"/feeds/light"); // FeedName

void MQTT_connect();

void setup() {
  Serial.begin(9600);

  pinMode(LED_PIN, OUTPUT);

  // Connect to WiFi access point.
  Serial.println(); Serial.println();
  Serial.print("\nConnecting to ");
  Serial.println(WLAN_SSID);

  WiFi.begin(WLAN_SSID, WLAN_PASS);
  while (WiFi.status() != WL_CONNECTED) {
    delay(500);
    Serial.print(".");
  }
  Serial.println();

  Serial.println("WiFi connected");
  Serial.println("IP address: ");
  Serial.println(WiFi.localIP());


  // Setup MQTT subscription for onoff feed.
  mqtt.subscribe(&Light1);
}

void loop() {

  MQTT_connect();

  Adafruit_MQTT_Subscribe *subscription;
  while ((subscription = mqtt.readSubscription(5000))) {
    if (subscription == &Light1) {
      Serial.print(F("Got: "));
      Serial.println((char *)Light1.lastread);
      int Light1_State = atoi((char *)Light1.lastread);
      digitalWrite(LED_PIN, Light1_State);
    }
  }
}

void MQTT_connect() {
  int8_t ret;

  // Stop if already connected.
  if (mqtt.connected()) {
    return;
  }

  Serial.print("Connecting to MQTT... ");

  uint8_t retries = 3;

  while ((ret = mqtt.connect()) != 0) { // connect will return 0 for connected
    Serial.println(mqtt.connectErrorString(ret));
    Serial.println("Retrying MQTT connection in 5 seconds...");
    mqtt.disconnect();
    delay(5000);  // wait 5 seconds
    retries--;
    if (retries == 0) {
      // basically die and wait for WDT to reset me
      while (1);
    }
  }
  Serial.println("MQTT Connected!");

}
Extra Instructions
- Step 1: Go to adafruit.io, create an account and follow the steps in the video
- Step 2: Go to ifttt.com, login with same account that you will use for Google Assistant and follow the steps in the video.
- Step 3: Install Adafruit MQTT library from library manager in Arduino software
- Step 4: Dump the code to NodeMCU and connect to Wi-Fi network
- Step 5: Open Google Assistant on your mobile phone and give voice commands as shown in video
Video Explanation

Suryateja Pericherla, at present is a Research Scholar (full-time Ph.D.) in the Dept. of Computer Science & Systems Engineering at Andhra University, Visakhapatnam. Previously worked as an Associate Professor in the Dept. of CSE at Vishnu Institute of Technology, India.
He has 11+ years of teaching experience and is an individual researcher whose research interests are Cloud Computing, Internet of Things, Computer Security, Network Security and Blockchain.
He is a member of professional societies like IEEE, ACM, CSI and ISCA. He published several research papers which are indexed by SCIE, WoS, Scopus, Springer and others.


Leave a Reply