This article provides a comprehensive overview of C++ basic concepts along with easy to understand examples.
Learn more about C++ programming language.
Contents
- 1 Tokens
- 2 Variables
- 3 Global Variables
- 4 Data Types
- 5 Constants
- 6 Operators
- 7 Namespace
- 8 Control Statements
Tokens
Smallest indivisible parts of a program are called lexemes and groups of similar lexemes are called tokens.
C++ program contains several elements and those are identified as tokens by a compiler.
Types of C++ tokens are as follows:
- Keywords
- Identifiers
- Constants
- Strings
- Operators
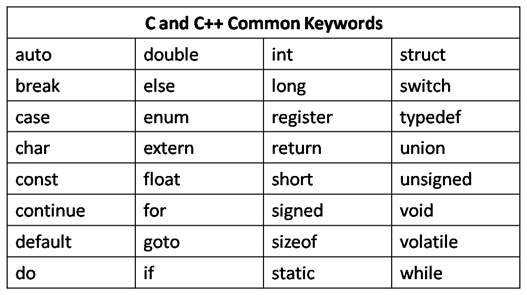
Keywords are words which are reserved by the compiler for specific purpose.
Keywords cannot be used as identifiers in programs.
Keywords available in C++ are as follows:
Identifiers are names given to variables, arrays, classes, functions, structures, etc.
Variables
What is a variable?
A variable is a placeholder or container in memory (RAM) for storing values.
We can store different values in a variable at different points of execution.
To use variables in a C++ program, we have to declare and initialize them.
Declaring a variable
Before using a variable in a program, we need to declare it.
Syntax for declaring a variable is as follows:
data_type variable_name;
In the above syntax, data_type tells the compiler about the type of data (ex: integer, character etc..) that will be stored in the variable with the name variable_name.
Quite often we hear the term called definition.
Defining a variable means specifying the amount of memory that the variable occupies.
Above declaration syntax also defines the memory that will be allocated (based on data type) to variable_name.
An example for variable declaration is as follows:
int x;
In the above syntax, x is the variable name and int is a data type which tells the compiler that x can store integer values.
We can’t write variable names as we like. There are some restrictions that apply to writing variable names. They are:
- Variable name must start with a letter or an underscore.
- Variable names must not contain white spaces.
- Variable names must not contain any special symbols like $, @, # etc.
- Variable names must not be same as any keyword like if, while, struct
Initializing a variable
After declaring a variable, we can assign or store a value in it. This is known as variable initialization.
Syntax for initializing a variable is as follows:
variable_name = value;
An example for initializing a variable is as follows:
x = 10;
We can combine variable declaration and initialization in to a single line as shown below:
data_type variable_name = value;
An example for declaring and initializing a variable in a single line is as follows:
int x = 10;
Note: If we don’t initialize a variable, it will contain garbage value. It is a good practice to initialize a variable to a default value when we declare it.
A small C++ program demonstrating the use of variables is given below.
In this program we add two values by storing them in two variables.
#include <iostream>
using namespace std;
int main()
{
	int num1, num2;
	cout<<"Enter a number: ";
	cin>>num1;
	cout<<"Enter another number: ";
	cin>>num2;
	cout<<"Sum of "<<num1<<" and "<<num2<<" is: "<<(num1+num2)<<endl;
	return 0;
}

Input and output for the above program is as follows:

Enter a number: 10
Enter another number: 29
Sum of 10 and 29 is: 39
In the above program, endl is a manipulator to print a new line.
Scope of a variable
The scope of a variable tells the compiler in which statements of the program can a variable be accessed.
Based on where the variable is declared, variables are divided into two types: local variables and global variables.
A local variable is a variable which is declared within a block (a block is a set of statements enclosed in between braces i.e { and }).
The scope of a local variable is within the block in which it is declared.
A block cannot have two or more local variables with the same name.
To demonstrate the scope of a local variable, consider the following program:
#include <iostream>
using namespace std;
int dosum(int x, int y)
{
	return x+y;
}
int main()
{
	int num1, num2;
	cout<<"Enter a number: ";
	cin>>num1;
	cout<<"Enter another number: ";
	cin>>num2;
	cout<<"Sum of "<<num1<<" and "<<num2<<" is: "<<dosum(num1, num2)<<endl;
	//cout<<"Sum of "<<num1<<" and "<<num2<<" is: "<<(x+y)<<endl;
	return 0;
}

Input and output for the above program is as follows:

Enter a number: 4
Enter another number: 6
Sum of 4 and 6 is: 10
In the above program, dosum() is a function. Functions will be explained later.
In dosum() function, variables x and y are local to that function. In main() function, variables num1 and num2 are local to that function.
Notice that in the above program the statement before return 0 line has been commented.
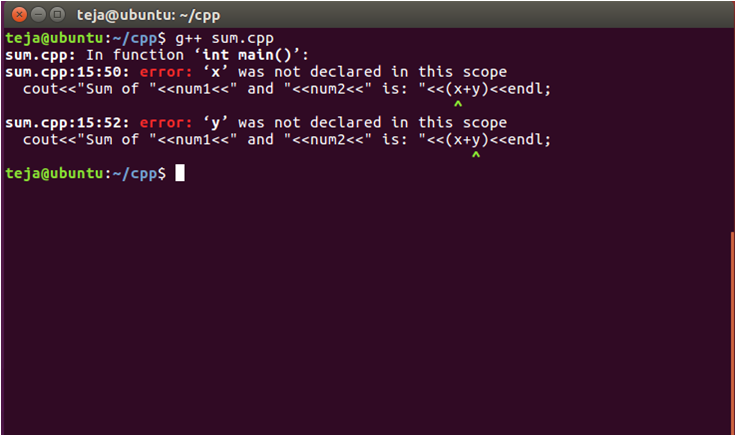
If the comments are removed and compiled, you will see the following error messages:
Above error messages are displayed as the variables x and y are local to dosum() function and cannot be accessed in main() function.
Global Variables
A variable that is declared outside all blocks is called a global variable.
The scope of a global variable is the entire program from the point at which it is declared.
To demonstrate the scope of a global variable, consider the following program:
#include <iostream>
using namespace std;
int dosum(int x, int y)
{
	//cout<<"global = "<<global<<endl;
	return x+y;
}
int global = 10;
int main()
{
	int num1, num2;
	cout<<"Enter a number: ";
	cin>>num1;
	cout<<"Enter another number: ";
	cin>>num2;
	cout<<"Sum of "<<num1<<" and "<<num2<<" is: "<<dosum(num1, num2)<<endl;
	cout<<"global = "<<global<<endl;
	return 0;
}

Input and output of the above program is as follows:

Enter a number: 3
Enter another number: 8
Sum of 3 and 8 is: 11
global = 10
In the above program, global is a global variable and observe that it is declared after the dosum() function.
The variable global is not accessible above the line at which it is declared.
That is why the print statement inside the dosum() is commented out. Removing the comments will produce compilation error.
Data Types
A data type specifies the type of data that we can work with.
As C++ is a strongly typed (not truly) language (type is specified before use), type of a variable must be specified before it is used.
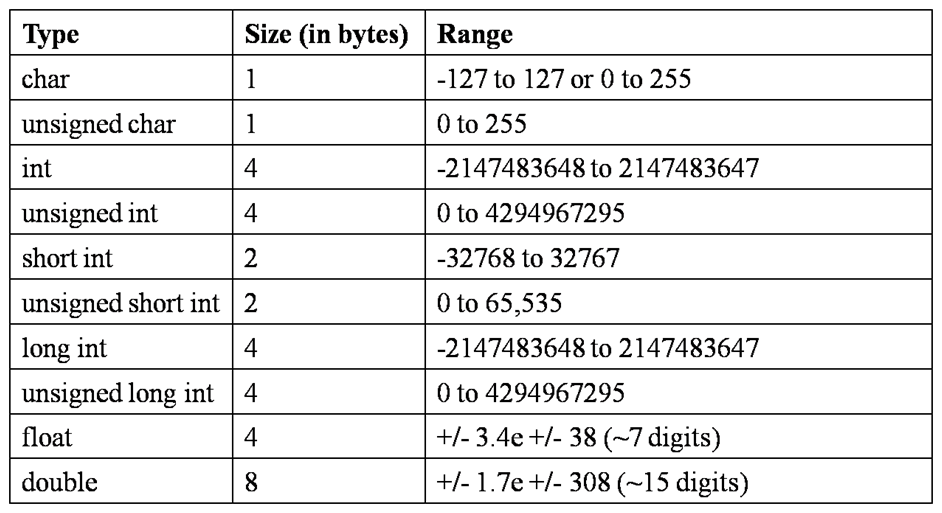
C++ provides several pre-defined data types. They are as shown in the following table:
Character data type
The char data type is used to work with single characters.
An example of storing a character into a variable is as follows:
char ch = 's';
In the above statement, ‘s’ is a character constant.
Size of char type is 1 byte which can hold values from -127 to 127 and size of unsigned char is 1 byte which can hold values from 0 to 255.
Since 256 values are not enough to represent all the characters across the world, C++ is not suitable for developing cross-language applications.
Integer data type
An integer data type is used to work with numbers that don’t have any fractional parts.
Standard data type for working with integers is int. Size of int data type is generally 4 bytes.
There are variations in int data type like short and long. All of these differ in terms of memory.
Another variation in integer types is signed and unsigned. In signed types, the Most Significant Bit (MSB) is reserved by specifying the sign (0 for positive and 1 for negative).
In unsigned types, MSB is also used to represent data.
Floating point data type
A floating point type allows us to work with real numbers which have decimal point.
Floating point types are float and double.
For example to store the value of mathematical PI value, we can declare a variable as follows:
float PI = 3.1415;
For double precision floating point values, we can use double type.
Boolean data type
Boolean data type allows us to work with true and false values which are known as boolean values.
These values can be used to maintain state, flag, available or unavailable kind of information.
C++ in the newer versions had provided support to work with boolean values by including bool data type.
Below example demonstrates bool data type:
bool flag = true;
Can we declare variables without data type?
C++ allows programmers to declare variables without specifying the data type.
Data type of such variables will be decided by the value that they are initialized to.
Such variables should be declared using the keyword auto as shown below:
auto flag = false;
In the above statement the data type of flag variable will be assumed to be bool by the compiler based on the value false.
typedef keyword
The typedef keyword can be used to create convenient names (types) for pre-defined data types.
Consider the following example which demonstrates the use of typedef keyword:
typedef float average;
In the above statement we are creating average as a type which is a substitute for the pre-defined type float.
Now we can create variables using average type as shown below:
average avg;
Constants
While programming you might need to store certain values which do not change throughout the program.
For example, in mathematical formulae for calculating the area and perimeter of a circle we need the value of PI to be same.
Such values are maintained as constants.
A constant is similar to a variable in the sense it is a placeholder in memory.
Only difference is value of a constant cannot be changed once initialized.
Constants in C++ can be:
- Literal constants (ex: 2, 5.6, ‘a’, “hi” etc.)
- Declared constants (using const keyword)
- Constant expressions (using constexpr keyword)
- Enumerated constants (using enum keyword)
- Defined constants (using #define pre-processor directive. This is not recommended and is deprecated)
Literal Constants
Constants that are used directly in the programs without declaration are literal constants.
Literal constants can be:
- Integer constants (ex: 5, 200, -4, etc.)
- Floating point constants (ex: 9.3, 0.3, 12.34343, etc.)
- Character constants (ex: ‘d’, ‘4’, ‘g’, ‘$’, etc.)
- String constants(ex: “a”, “hi”, “C++”, “my name”, etc.)
Declared Constants (const)
The most important and frequently used type of constants are constants which are declared using the keyword const.
General syntax for declaring a constant using const keyword is as follows:
const data-type constant-name = value;
A constant should be initialized at the time of declaration itself.
Let’s look at an example for declaring a constant using const keyword.
const double PI = 3.1415;
In the above example, PI is the constant name and its value is 3.1415.
Following is a program which demonstrates the use of const keyword:
#include <iostream>
using namespace std;
const double PI = 3.1415;
double area(int r)
{
	return PI*r*r;
}
double peri(int r)
{
	return 2*PI*r;
}
int main()
{
	int radius;
	//PI = 3.142;
	cout<<"Enter radius of the circle: ";
	cin>>radius;
	cout<<"Area of the circle is: "<<area(radius)<<endl;
	cout<<"Perimeter of the circle is: "<<peri(radius)<<endl;
	return 0;
}

Input and output for the above program is as follows:

Enter radius of the circle: 3.6
Area of the circle is: 28.2735
Perimeter of the circle is: 18.849
In the above example, area() and peri() are functions. We will look at functions later.
Observe that in the above program, PI is a global constant as it is declared outside all blocks.
Also, the line after the statement int radius is commented.
If you remove the comments, it will result in a compilation errors as constants cannot be initialized again after declaration.
The error message will be as follows:
ConstDemo.cpp: In function ‘int main()’:

ConstDemo.cpp:15:5: error: assignment of read-only variable ‘PI’
Constants expressions (constexpr)
Using constexpr we can create constants whose value is determined by evaluating an expression at compile time.
We can also use constexpr with functions, constructors and objects.
When used along with a function, it will be treated as an inline function which can improve the performance of the program.
Following is an example which demonstrates the use of constexpr keyword:
#include <iostream>
using namespace std;
constexpr double PI = 22.0 / 7;
constexpr double area(int r)
{
	return PI*r*r;
}
constexpr double peri(int r)
{
	return 2*PI*r;
}
int main()
{
	int radius;
	cout<<"Enter radius of the circle: ";
	cin>>radius;
	cout<<"Area of the circle is: "<<area(radius)<<endl;
	cout<<"Perimeter of the circle is: "<<peri(radius)<<endl;
	return 0;
}

Input and output for the above program is as follows:
teja@ubuntu:~/cpp$ g++ ConstDemo.cpp -std=c++11
teja@ubuntu:~/cpp$ ./a.out

Enter radius of the circle: 3.56
Area of the circle is: 28.2857
Perimeter of the circle is: 18.8571
Note: constexpr was introduced in C++11 version. To enable g++ compiler to use C++11, we should use the flag “-std=c++11″. Otherwise when we compile the program, it will raise several errors.
Enumerated Constants (enum)
In some scenarios we might want a variable to have a limited set of values like days of a week or months in a year etc.
For these situations we can use an enumerated constant which can be declared using the enum keyword.
General syntax of creating enumerated constants is as follows:
enum constant-name{value1, value2, ..., valueN};
An example of using enum is as follow:
enum days{Mon, Tue, Wed, Thu, Fri, Sat, Sun};
In the above example days is just like a variable but only accepts the given constant values.
By default compiler assigns numeric value to each constant and the starting value is 0 and the subsequent constants are given previous value plus one.
So, value of Mon is 0, Tue is 1, and so on.
We can also assign our own values to the constants as demonstrated in the following program:
#include <iostream>
using namespace std;
int main()
{
	enum days{Mon = 1, Tue, Wed, Thu, Fri, Sat, Sun};
	days bday = Fri;
	cout<<"Day is: "<<bday<<endl;
	return 0;
}

Output of the above program is as follows:

Day is: 5
In the above program Mon is assigned 1. So, value of Tue is 2 and so on.
We can use the enumerated constant like a type and declare new variables.
In the above example bday is such variable declared using the enumerated constant days.
Defined Constants (#define)
Another way of declaring constants is by using the #define pre-processor directive.
This method of declaring constants is not recommended and is deprecated.
Syntax for declaring a constant using #define is as follows:
#define Constant-Name Value
Notice that in the above syntax there is no semi-colon at the end of the statement.
An example for using #define is as follows:
#define PI 3.1415
Following is a program which demonstrates the use of #define pre-processor directive:
#include <iostream>
#define PI 3.1415
using namespace std;
int main()
{
	cout<<"Value of PI is: "<<PI<<endl;
	return 0;
}

Output of the above program is as follows:

Value of PI is: 3.1415
Operators
It is common in programming to use various kinds of operations like addition, subtraction, multiplication etc.
C++ supports wide variety of operators which can be broadly divided in to following categories:
- Arithmetic operators
- Relational operators
- Logical operators
- Bitwise operators
- Other operators
Assignment Operator
The assignment operator (=) is used to assign the value of an expression to a variable and can be used within any valid expression.
We need to know about two important terms frequently encountered in compiler error messages: lvalue and rvalue.
Lvalue refers to the variable on the left hand side of the assignment operator and Rvalue refers to the expression on the right hand side of the assignment operator.
The expression on the right hand side can be a constant or a variable or a complex expression.
Left hand side should never be a function or a constant.
Multiple variables can be assigned the same value using assignment operator as shown below:
int a, b, c;

a = b = c = 0;
Arithmetic Operators
Perhaps arithmetic operators are the most frequently used operators in programs.
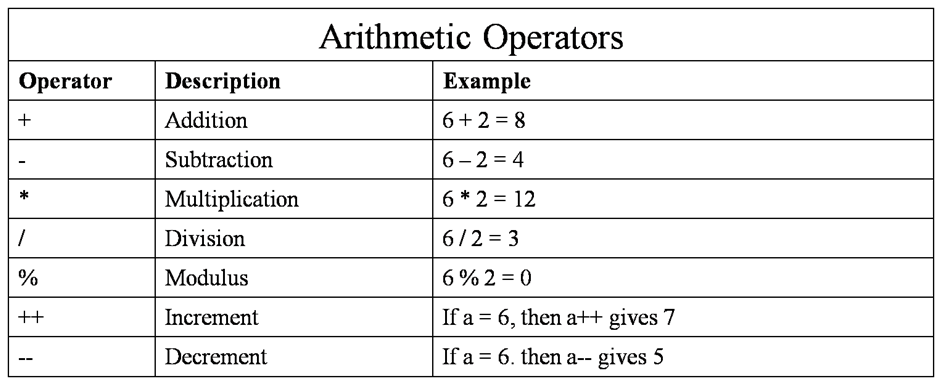
Arithmetic operators contains operators for performing addition, subtraction, multiplication, division and modulus (remainder).
Remember that floating point values cannot be used along with modulus operator.
Arithmetic operators are as follows:
Also increment (++) and decrement (–) operators are included in this category.
Increment operator increments the value of operand by one and decrement operator decrements the value of the operand by one.
Both of these operators are unary operators i.e they are used along with a single operand.
Increment and decrement operators can be used before or after the operand.
If they are used before the operand, they are called as pre increment / decrement operator or if they are used after the operand, they are called as post increment / decrement operator.
In expressions, post and pre increment / decrement operators have different effects. Consider the following example:
a = 5;

b = a++;
While using post increment, value of the operand is fetched, used in the expression and then it is incremented.
So, value of b is 5 in the above example. Now, consider another example:
a = 5;

b = ++a;
While using pre increment, value of the operand is fetched, incremented and then used in the expression. So, value of b is 6 in the above example.
Relational Operators
Whenever we want to compare two values or variables, we can use relational operators.
These operators return true or false based on the values or variables used in the expression.
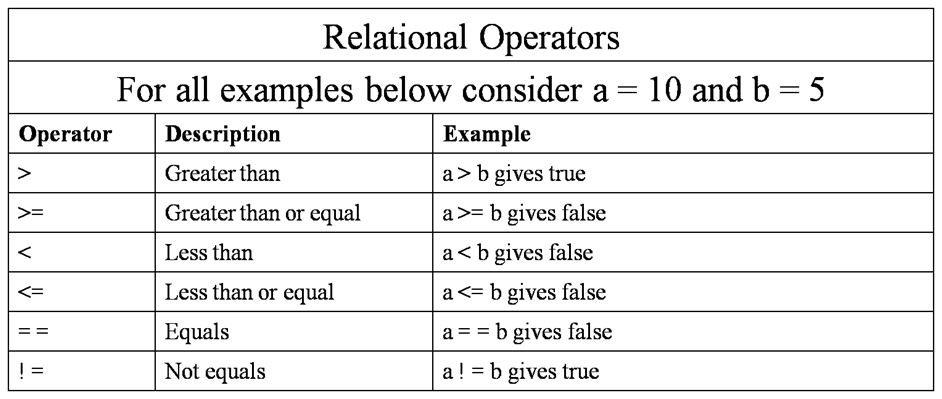
Relational operators in C++ are as follows:
Logical Operators
Operators which are frequently used in conjunction with relational operators to measure the logical (boolean) value of an expression are the logical operators.
Expressions with logical operators always evaluates to either true or false.
Logical operators in C++ are as follows:
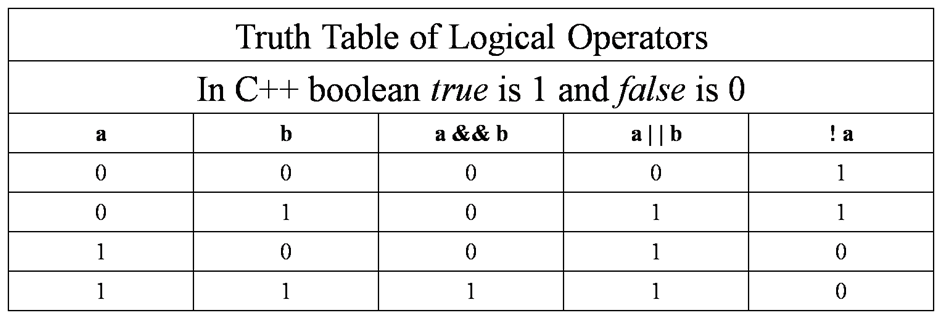
The truth table of the above mentioned logical operators is as follows:
The logical operators && and || are called short-circuit operators. In a boolean expression having logical AND (&&), when left expression is false, right expression is never evaluated.
Similarly in a boolean expression having logical OR (||), when left expression is true, right expression is never evaluated.
Bitwise Operators
All the operators discussed until now operate at value or variable level.
As C++ is a superset of C language, C++ also supports low-level programming.
In low-level programming it is common to manipulate individual bits.
Such bit-level programming is supported by bitwise operators.
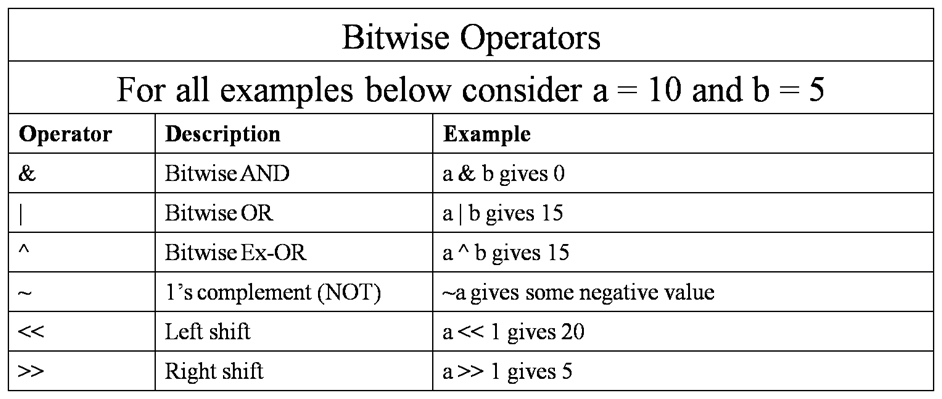
Bitwise operators in C++ are as follows:
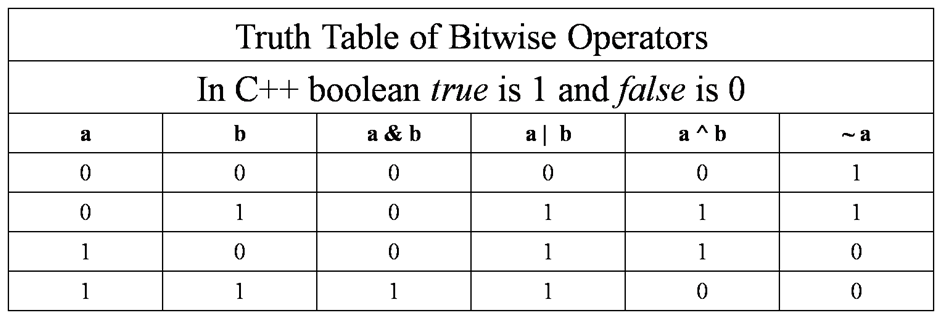
Truth table for the bitwise operators is as follows:
Performing left shift once is equivalent to multiplying the value by 2 and performing right shift once is equivalent to dividing the value by 2.
Bitwise operators are used in low-level programming like writing device drivers, printer routines etc.
Special Operators
Apart from general operators there are other operators which are used for special purpose.
? Operator
C++ supports a powerful operator called conditional operator (?) which is an equivalent to some of the if-then-else statements (will be explained later).
Conditional operator is a ternary operator. General form of conditional operator is as follows:
expr1 ? expr2 : expr3;
In the above syntax, expr1, expr2, and expr3 are expressions. First expr1 is evaluated.
If expr1 evaluates to true then expr2 is executed. Otherwise, expr3 is executed.
Consider the following example for conditional operator.
int a = 10, b = 5, c;

c = (a>b) ? 20 : 12;
In the above example, a>b evaluates to true and c will be assigned the value of 20.
& and * Operators
A pointer (will be explained in detail later) is a memory address.
A pointer variable is a variable which is capable of holding the address of another memory location.
We use two operators along with pointers.
They are address (&) operator and dereferencing (*) operator.
The syntax for declaring a pointer is a follows:
data-type *pointer-name;
So, while declaring a pointer variable we have to use *. Let’s declare an integer pointer.
int *p;
In the above example p is a pointer of the type int. It is capable of storing the address of a memory location which holds an integer value.
Now, we can obtain the address of a variable using & operator as shown below:
int a = 10;

int *p;

p = &a;
In the above example we are retrieving the address of variable a using & operator and assigning it to pointer p.
Now, we can modify the value of variable a indirectly by using the pointer p as follows:
*p = 20;
In the above example, *p can be read as value stored at the address pointed by p.
sizeof Operator
sizeof is a unary compile-time operator which returns the size of operand in bytes.
General syntax of sizeof operator is as follows:
sizeof(operand)
When using sizeof along with variables, we can omit parentheses.
But, when using with basic data types like int, double, etc., we have to use parentheses also.
Consider the following example which demonstrates sizeof operator:
int a = 10;

cout<<Size of a is:<<sizeof a<<endl;

cout<<Size of int is:<<sizeof(int)<<endl;
In the above example, both statements will give the same size of 4 bytes (size of an integer).
Dot (.) and Arrow (->) Operators
Both of these operators are used to access the members of structures, unions and classes in C++.
In case of structures and unions, dot operator is used when accessing the members directly.
Arrow operator is used while accessing members using a pointer.
These two operators will be explained in detail later.
[ ] and ( ) Operators
Square brackets are used along with arrays to reference the array elements and parentheses are used to increase the precedence of expressions and are also used along with functions.
Comma (,) Operator
The comma operator is used to join several expressions together.
The left side of the comma operator is always evaluated as void.
When used in an assignment statement, the value of the last expression (right-most) is the value to be assigned.
Remember that when using along with assignment (=) operator, enclose comma separated expressions inside parentheses as comma operator has lower precedence (importance) than assignment operator.
Consider the following example which demonstrates the use of comma operator:
int a, b, c;

c = (a=5, b=5, a+b);
In the above example, first a is assigned 5, then b is assigned 5 and finally 10 (a+b) is assigned to c.
Scope Resolution Operator (::)
The scope resolution operator helps in resolving the scope of a variable or a class member.
When the C++ program contains two variables with same name i.e. for example one global and another local variable, we can access the global variable using the scope resolution operator.
Consider the following code:
int x; //global variable
void myfun( )
{
	int x; //local variable
	...
	...
	x = 20; //refers to local x
	..
	..
	::x = 20; //refers to global x
	..
}
In the above code sample, ::x refers to the global variable x.
Memory Management Operators
As C language provides malloc() and free() for allocating and deallocating memory, C++ provides new and delete operators for allocating and deallocating memory.Since the memory allocated and deallocated by these operators is at runtime, they are called as dynamic allocation operators.
The new operator is used to allocate dynamic memory. It returns a pointer to the newly created memory.
There is no need to specify the size of the memory to allocate and cast the pointer to respective type.
It is done automatically by the new operator. General syntax of new is as follows:
p-var = new type;
In the above syntax, p-var is a pointer variable and type is the data type of value to be stored in the newly allocated memory location.
Dynamic memory is allocated on the heap (area in memory) and this heap is of limited size.
When the heap is filled out, new will raise an exception bad_alloc which must be caught.
More about exceptions and exception handling later.
The delete operator is used to deallocate the memory.
General syntax of delete operator is as follows:
delete p-var;
In the above syntax, p-var is the pointer variable which holds the pointer to the dynamic memory.
Consider the following example which demonstrates both new and delete operators:
int *p;

p = new int;

*p = 150;

delete p;
Namespace
It is common in large programs or projects to create multiple files and declare variables, functions, classes, etc. with same names which results in collisions of names.
In order to eliminate collisions, C++ introduced the concept of namespaces which is a logical space for creating names.
A namespace can be created using the keyword namespace and its syntax is as follows:
namespace  name
{
	//declarations
	...
	...
	...
}
Essentially a namespace creates a scope of for all the elements inside it.
Syntax for accessing an element outside the namespace is as follows:
namespace::element
If we are accessing a member of the namespace at multiple spots within a program, it will become cumbersome to use the above syntax at every point.
Instead we use the using keyword to use the namespace once.
We can use the entire namespace or only a single member of the namespace using the following syntax:
using  namespace  name;

using  name::member;
In the above syntax, name is the name of the namespace we want to use and member is the name of the element we want to access in our program.
Control Statements
When a program is executed, the statements are executed sequentially one after another if there are no control statements.
However, in general, in almost every program there will be need to skip some statements, repeat a set statements or execute a set of statements based on a condition.
Such types of execution can be achieved through control statements.
Control statements are generally divided into three categories:
- Selection statements
- Iterative statements
- Jump statements
Selection statements
These statements allows programmers to execute a set of statements based on the value of a condition.
Selection statements in C++ are if…else, nested if, else if ladder and switch statement.
if…else
The if…else statement is a two way selection statement.
The syntax of if…else statement is as follows:
if(condtion)
{
	//Execute statements when condition is true
	...
}
else
{
	//Execute statements when condition is false
	...
}
In the above syntax, when condition evaluates to true, if block is executed. Otherwise, else block is executed.
Consider the following program which prints out the largest number among two numbers using if…else statement:
#include<iostream>
using namespace std;
int main()
{
	int a, b;
	cout<<"Enter first number: ";
	cin>>a;
	cout<<"Enter second number: ";
	cin>>b;
	if(a>b)
		cout<<a<<" is the largest number"<<endl;
	else
		cout<<b<<" is the largest number"<<endl;
	return 0;
}

Input and output of the above program is as follows:

Enter first number: 15
Enter second number: 7
15 is the largest number
In the above program as the condition a>b returns true, only the if block is executed.
Note: Remember that the else part in if…else is entirely optional. But, on the contrary you can’t write else without an if statement.
Note: When if block and else block contains only one statement, braces can be removed.
Nested if
To check multiple conditions we can use logical operators or we can use nested if statement.
Syntax of nested if is as follows:
if(condtion)
{
	//Execute statements when condition is true
	if(another condition)
	{
		//Execute statements when condition is true
		...
	}
	else
	{
		//Execute statements when condition is false
		...
	}
}
else
{
	//Execute statements when condition is false
	...
}
In the above syntax if first condition is true, then next condition is evaluated and so on.
Consider the following program to find out the largest among three numbers using nested if statement:
#include<iostream>
using namespace std;
int main()
{
	int a, b, c;
	cout<<"Enter first number: ";
	cin>>a;
	cout<<"Enter second number: ";
	cin>>b;
	cout<<"Enter third number: ";
	cin>>c;
	if(a>b)
	{
		if(a>c)
			cout<<a<<" is the largest number"<<endl;
	}
	else if(b>c)
		cout<<b<<" is the largest number"<<endl;
	else
		cout<<c<<" is the largest number"<<endl;
	return 0;
}

Input and output of the above program is as follows:

Enter first number: 5
Enter second number: 10
Enter third number: 20
20 is the largest number
else if Ladder
The else if ladder is a multi-way selection statement that allows us to select one set of statements among multiple sets.
The set of statements to be executed is based on a condition.
Syntax of else if ladder is as follows:
if(condition 1)
{
	//Statements to execute
}
else if(condition 2)
{
	//Statements to execute
}
else if(condition 3)
{
	//Statements to execute
}
...
else if(condition n)
{
	//Statements to execute
}
else
{
	//Statements to execute
}
In the above syntax, only one block will be executed based on which condition evaluates to true.
If one of the condition is true, remaining conditions will be skipped. Final else is optional.
Consider the following program which checks whether the entered character is a vowel or not using else if ladder:
#include<iostream>
using namespace std;
int main()
{
	char ch;
	cout<<"Enter a character: ";
	cin>>ch;
	if(ch == 'a')
		cout<<"a is a vowel"<<endl;
	else if(ch == 'e')
		cout<<"e is a vowel"<<endl;
	else if(ch == 'i')
		cout<<"i is a vowel"<<endl;
	else if(ch == 'o')
		cout<<"o is a vowel"<<endl;
	else if(ch == 'u')
		cout<<"u is a vowel"<<endl;
	else
		cout<<ch<<" is not a vowel"<<endl;
	return 0;
}

Input and output for the above program is as follows:

First run:
Enter a character: e
e is a vowel

Second run:
Enter a character: o
o is a vowel

Third run:
Enter a character: h
h is not a vowel
switch
The switch statement is also a multi-way selection statement and is similar to else if in functionality.
Frequently used keywords along with switch are: case, break, and default.
The syntax of a switch statement is as follows:
switch(expression)
{
	case Label1:
		//Statements to execute
		break;
	case Label2:
		//Statements to execute
		break;
	...
	case LabelN:
		//Statements to execute
		break;
	default:
		//Statements to execute
}
In the above syntax, the value of expression is matched against one of the labels Label1, Label2, …, LabelN. All the labels must be constants.
If none of the labels match, the default block is executed. The default block is optional.
At the end of each case you can see a break statement which is optional.
The execution stops whenever the break is encountered.
Otherwise, the execution continues with the next case until a break is encountered or it reaches the end of switch.
Consider the following program which checks whether the entered character is a vowel or not using switch:
#include<iostream>
using namespace std;
int main()
{
	char ch;
	cout<<"Enter a character: ";
	cin>>ch;
	switch(ch)
	{
		case 'a':
			cout<<"a is a vowel"<<endl;
			break;
		case 'e':
			cout<<"e is a vowel"<<endl;
			break;
		case 'i':
			cout<<"i is a vowel"<<endl;
			break;
		case 'o':
			cout<<"o is a vowel"<<endl;
			break;
		case 'u':
			cout<<"u is a vowel"<<endl;
			break;
		default:
			cout<<ch<<" is not a vowel"<<endl;
	}
	return 0;
}

Input and output for the program is as follows:

First run:
Enter a character: e
e is a vowel

Second run:
Enter a character: v
v is not a vowel
Iterative statements or Looping statements
Iterative statements are used to repeat a set of statements in a loop based on a condition.
Iterative or looping statements in C++ are while, do-while, and for.
while Loop
A while loop is pre test loop which is used to repeat a set of statements as long as the condition is true.
Syntax of while is as follows:
while(condition)
{
	//Statements to be executed repeatedly
	...
}
Consider the following program which prints 1-10 using a while loop:
#include<iostream>
using namespace std;
int main()
{
	int i = 1;
	while(i<=10)
	{
		cout<<i<<" ";
		i++;
	}
	cout<<endl;
	return 0;
}

Output of the above program is as follows:

1 2 3 4 5 6 7 8 9 10
do-while Loop
A do-while loop is a post test loop i.e., the body of loop is executed and then the condition is evaluated.
Specialty of do-while loop is, the body of this loop is guaranteed to be executed at least once.
Syntax of do-while loop is as follows:
do
{
	//Statements to be executed repeatedly
	...
}while(condition);
Consider the following program which prints 1-10 using do-while loop:
#include<iostream>
using namespace std;
int main()
{
	int i = 1;
	do
	{
		cout<<i<<" ";
		i++;
	}while(i<=10);
	cout<<endl;
	return 0;
}

Output of the above program is as follows:

1 2 3 4 5 6 7 8 9 10
for Loop
Compared to the other two loops, for loop is somewhat complex.
Syntax of for loop is as follows:
for(initialization; condition; update)
{
	//Statements to be executed repeatedly
	...
}
In for loop, initialization is executed first followed by the evaluation of condition.
If it is true, body of for loop is executed followed by execution of update. Then condition is again evaluated and so on.
Consider the following program which prints 1-10 using for loop:
#include<iostream>
using namespace std;
int main()
{
	for(int i=1;i<=10;i++)
	{
		cout<<i<<" ";
	}
	cout<<endl;
	return 0;
}

Output of the above program is as follows:

1 2 3 4 5 6 7 8 9 10
Jump Statements
Jump statements in C++ are used to transfer control unconditionally.
Jumps statements in C++ consists of break, continue, return, and goto.
Usage of jump statements must be limited in programs as they might decrease readability or cause undesired effects.
Especially usage of goto is strictly not recommended as it might lead to spaghetti code.
break
We already used break in switch statement. It can also be used inside loops to transfer control outside the loop.
Generally such transfer control is associated with a condition evaluation.
Consider the following program which demonstrates the use of break:
#include<iostream>
using namespace std;
int main()
{
	for(int i=1;i<=10;i++)
	{
		if(i==5) break;
		cout<<i<<" ";
	}
	cout<<endl;
	return 0;
}

Output of the above program is as follows:

1 2 3 4
In the above program when i becomes 5, condition i==5 becomes true and the control is transferred to the next statement outside the for loop.
continue
The continue statement can be used only inside loops.
When used inside a loop, statements after the continue statement inside the loop body are skipped and execution again starts from the first statement inside the loop.
Consider the following program which demonstrates the use of continue:
#include<iostream>
using namespace std;
int main()
{
	for(int i=1;i<=10;i++)
	{
		if(i==5) continue;
		cout<<i<<" ";
	}
	cout<<endl;
	return 0;
}

Output for the above program is as follows:

1 2 3 4 6 7 8 9 10
In the above program, when i becomes 5, statement after continue is skipped and execution again starts from beginning of the loop.
return
The return statement is generally used inside functions to return control to the calling function which is in general main() function.
When a return statement is encountered, control exits the current function and starts with the next statement after the function call.
We will learn about return statement in details later in functions topic.
goto
The goto statement is used to transfer control to a point backward or forward from the current line. The point of transfer is identified by a label.
Syntax of goto is as follows:
{
	...
	Label:
	...
	...
	goto Label;
	...
	...
}
We can use goto anywhere in a program and also the Label can be placed before or after the goto statement.
Since use of goto is strictly prohibited, we will not discuss about it further.
In the next article w will learn about arrays and strings in C++.

Suryateja Pericherla, at present is a Research Scholar (full-time Ph.D.) in the Dept. of Computer Science & Systems Engineering at Andhra University, Visakhapatnam. Previously worked as an Associate Professor in the Dept. of CSE at Vishnu Institute of Technology, India.
He has 11+ years of teaching experience and is an individual researcher whose research interests are Cloud Computing, Internet of Things, Computer Security, Network Security and Blockchain.
He is a member of professional societies like IEEE, ACM, CSI and ISCA. He published several research papers which are indexed by SCIE, WoS, Scopus, Springer and others.




The document was really helpful and self explained , keep up the good work …you should just include more examples for practicing, otherwise the document is just fine .
Thanks mam